
 People · Events · Communities

Quick answer: A member journey map is a one-page outline of the path a member takes through your organization, stage by stage, from the member’s point of view. To build one, choose a segment, define five to seven stages, interview real members, list touchpoints and feelings, mark friction points, and give each fix an owner.
Key takeaways
-
Map one segment first, usually new members.
-
Talk to real members, including at least one who left.
-
The first weeks decide a lot: make the first step easy.
-
A map without owners and fixes is just a poster.
Most associations know what they do for members. Far fewer know what it feels like to be one. A member journey map closes that gap by laying out, stage by stage, what a member does, thinks, and needs, from the day they first hear about you to the day they renew, or quietly leave.
This guide explains what a member journey map is, what goes into one, and how to build one in seven steps, with a template you can copy and an example to follow. You do not need special software to start. For the strategies a map helps you choose, see our guide to member engagement strategies.
What is a member journey map?
A member journey map is a visual outline of the path a member takes through your organization: the stages they pass through, the touchpoints they meet, what they are trying to achieve, where they get stuck, and what your team does in response.
It differs from a process flowchart. A flowchart shows how your organization works internally. A journey map shows the relationship from the member’s side, and that change of viewpoint is where most of its value comes from.
Why build a member journey map?
Members rarely announce that they are unhappy. They stop opening emails, skip an event, or let an invoice sit. A journey map helps you find those moments before they become lapsed memberships.
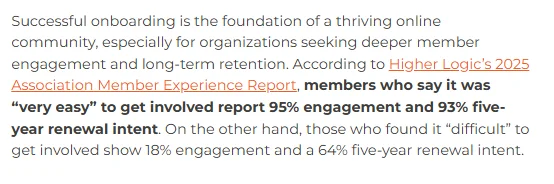
The early stages matter most. Higher Logic’s 2025 Association Member Experience Report found that members who said it was “very easy” to get involved reported 93% five-year renewal intent, compared with 64% among those who found it “difficult”. A map shows you exactly where getting involved is hard.
Three more benefits stand out:
-
You see gaps you cannot see from the inside. Staff know every process, so friction that members feel can look normal to your team.
-
Teams align on one picture. Membership, events, finance, and communications each own part of the journey, and the map shows how the parts fit.
-
You prioritize with evidence. Instead of fixing whatever is loudest, you fix the moments that matter most to members.
It is also a practical way to spot silent churn. Our guide on how to reduce membership churn covers what to do when the warning signs appear.
What does a member journey map include?
A useful map is simple. Capture these elements for each stage:
| Element | What it captures | Example |
|---|---|---|
| Stage | A phase of the relationship | Onboarding |
| Member goal | What the member wants right now | Feel welcome and find the right event |
| Touchpoints | Where they meet your organization | Welcome email, portal, first event, local chapter |
| Feelings and questions | What they think and feel | “Is this worth the dues?” |
| Pain points | Where they get stuck or drift | No reply to a profile question |
| Staff actions | What your team does today | Sends one welcome email |
| Signals | Data that shows how it is going | Event registrations, email opens |
Keep it to one page at first. A map nobody reads is no use, however detailed.
Who should help build it?
Do not build the map alone. Bring in one person from each team that touches members: membership, events, communications, and finance. Add a board member, chapter leader or volunteer if you can. Each person knows a different part of the journey, and the conversation itself often surfaces problems before any data does. Keep the group to four to six people so the work keeps moving.
How do you build a member journey map in 7 steps?
To build a member journey map, choose one segment, define the stages, gather real input, list actions and touchpoints, capture feelings and questions, mark moments of truth and friction, and assign owners and fixes.
1. Choose one member segment
Start with one group, such as new members, rather than everyone. A first-year member and a ten-year volunteer want different things. Pick the segment whose journey matters most to your goals, and map the others later.
2. Define the stages
Write the stages in order. A common starting point is discover, join, onboard, engage, renew, and re-engage. Rename them to match your organization. Five to seven stages works well: fewer hides detail, and more becomes hard to read.
3. Gather real input
Do not map from memory. Talk to a handful of members from your chosen segment, including at least one who left. Add a short survey, and review the data you already have: attendance, email activity, payment history, and support requests. Staff who answer member questions every day are a rich source too.
Good questions to ask in interviews:
-
Why did you join, and what were you hoping for?
-
What was your first month like?
-
What nearly made you leave, or did make you leave?
-
What would you tell a friend considering membership?
4. List actions and touchpoints
For each stage, write what the member does and where they meet you. Include the unglamorous touchpoints: the application form, the invoice, the password reset. They often shape the experience more than the flagship event.
5. Capture feelings and questions
Add what members are likely thinking at each stage, in their own words. “Where do I start?” at onboarding and “What did I get for this?” at renewal tell you more than a list of activities does.
6. Mark moments of truth and friction
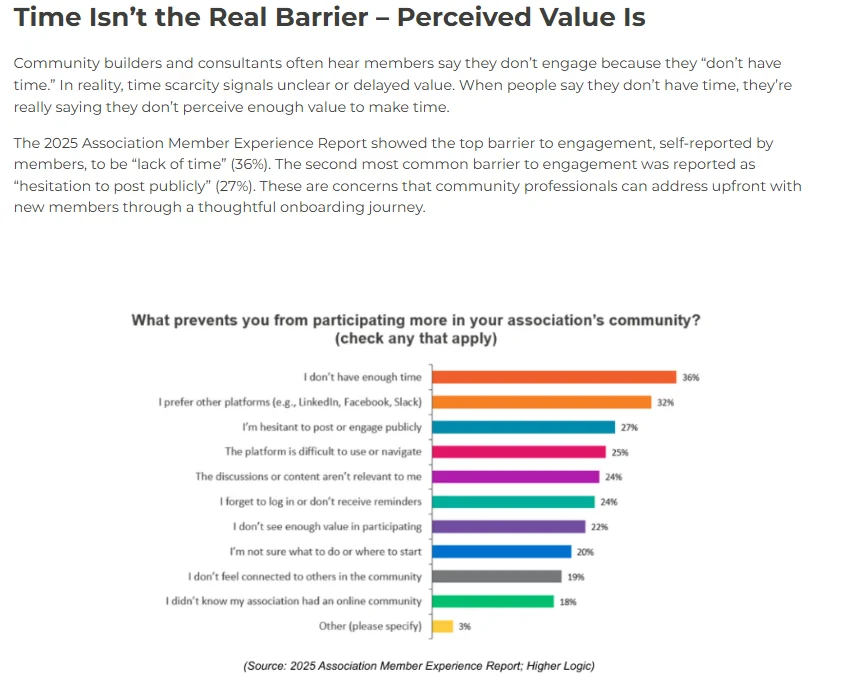
Highlight the moments that most affect whether someone stays: the first week, the first event, the first invoice, the renewal notice. Then mark every point of friction, such as slow replies, confusing forms, or messages that arrive too late. Watch for time pressure too: in Higher Logic’s research, members named lack of time (36%) as the top barrier to engaging, so a step that takes too long is a step people skip.
7. Assign owners and fixes
A map without owners is a poster. For each pain point, name one person responsible and one change to try. Start with two or three fixes, not twenty.
Member journey map template
Copy this structure into a spreadsheet, slide, or whiteboard, and adapt the stages to your organization:
| Stage | Member is asking | Touchpoints | Signal to watch |
|---|---|---|---|
| Discover | Is this for someone like me? | Website, referrals, events | Visits to the membership page |
| Join | Is this easy and worth it? | Application, payment, confirmation | Abandoned applications |
| Onboard | Where do I start? | Welcome emails, profile, first event, chapter introduction | Time to first engagement |
| Engage | Am I getting value? | Events, education and CE credits, committees | Attendance, email opens, credits earned |
| Renew | Was this year worth it? | Renewal notice, invoice | Renewal and first-year renewal rate |
| Re-engage | Is there still a place for me? | Personal outreach, new offers | Replies, returns |
Turn the “signal to watch” column into a call list. The free Member Risk Scoring Sheet ranks members by the warning signs in your map, so you know who to contact first. Open the Member Risk Scoring Sheet
Example: mapping the first 90 days
The first months deserve their own map. Marketing General Incorporated (MGI) describes one association where 21% of new members cancelled in their first three months, and cites benchmark data showing first-year members renew at 72% compared with 82% overall. That single association paid dues in monthly installments, but the pattern is familiar.
Picture a professional association mapping the journey for new members. In interviews, new members say they joined for networking but did not know which event to attend first. The association’s own data shows that many join and then register for nothing for months.
The map makes the gap visible. Between joining and engaging, the member receives a receipt and a generic newsletter. The fix is small: a welcome message that recommends one event, a personal introduction to two members, and a check-in at day 30. The team also decides to track time to first engagement, the number of days between joining and a first meaningful action. At the next renewal, they compare first-year renewals with the map to see whether the change worked. Our 90-day onboarding plan covers the rest of that stretch.
This is an illustration, not a client case, but it shows the pattern. One stage, one pain point, one change, one metric.
See where your members stall. Bring one segment, and we will show you each stage of its journey on one member record. Book a demo
Common mistakes when building a member journey map
-
Mapping from assumptions. Without member input, you document your own view, not theirs.
-
Trying to map everyone. One segment first. Add others once the process works.
-
Making it too detailed. If it does not fit on a page, people will not use it.
-
Stopping at the map. The value comes from the fixes, not the diagram.
-
Never updating it. Review it each quarter as programs and members change.
How do you use your member journey map?
Once built, put the map to work. Share it with every team that touches members. Pick one metric per stage and review them monthly. After each renewal cycle, compare what actually happened with what the map predicted, and adjust. Use the map to decide where automation helps, such as welcome sequences and renewal reminders, and where a personal call works better.
For the metrics side, see our guide to member engagement metrics, which gives a formula for each signal in the template. For the wider lifecycle, see our overview of membership management.
Where technology helps
You can build your first map on a whiteboard. Keeping it alive is harder, because the signals that show how members move through it live in different tools: registrations in one, email in another, payments in a third. When those signals share one member record, your team can see who is stalling at which stage without assembling reports by hand, and a member engagement score flags members whose activity is dropping. Whatever tool you consider, ask whether it can show where each member sits in the journey today, not only where they were last month.
Melora Connect keeps that record for you. Smart segments for new, at-risk, and lapsed members line up with the onboard, engage, and re-engage stages, automated renewal reminders cover the renew stage, and the member portal gives members one place to renew, pay, register for events, and update their profile. Chapters and CE credits are live too, so a chapter introduction or a credit earned shows up on the same record as everything else. Our team helps you set it up around the journey you mapped, because you get a team, not a login.
Frequently asked questions about member journey maps
What is a member journey map?
A member journey map is a one-page outline of the path a member takes through your organization, from discovering you to renewing or leaving. For each stage it shows the member’s goal, touchpoints, feelings, pain points, staff actions and the signals that show how it is going.
How do you build a member journey map?
Choose one segment, define five to seven stages, interview real members including one who left, list touchpoints, capture feelings and questions, mark moments of truth and friction, then assign an owner and one fix to each pain point. Review the map every quarter.
How is a member journey map different from the membership lifecycle?
The lifecycle names the stages every member passes through. A journey map adds the member’s side: what they are trying to do, what they feel, and where they get stuck at each stage.
How many stages should a member journey map have?
Five to seven works for most organizations, for example discover, join, onboard, engage, renew and re-engage. Fewer hides detail, and more becomes hard to read on one page.
How often should I update it?
Review it each quarter, and rebuild it after a major change such as a new membership tier, a new event program, new chapters, or a move to a new system.
Do I need software to build one?
No. A whiteboard or a spreadsheet is enough for the first map. Software helps later, when you want to see which stage each member is in right now.
The bottom line
A member journey map is only useful if it changes something. Map one segment, fix the one or two moments where members get stuck, and measure whether the fix worked. Then pick the next segment and do it again.
See your member journey in one place. Smart segments, renewal reminders and the member portal on one record, set up with our team. Book a demo
Sources
-
Higher Logic, Elevating Community Onboarding: Insights and Strategies for 2026, March 3, 2026.
-
Marketing General Incorporated, The Psychology of Membership Engagement, 2026.